I have written about my patrol rifle and the B377 SBR in the past. I recently decided to combine the two rifles to make one rifle that handles all my requirements for a duty/patrol/truck/personal rifle. I will be doing a video about the end result soon, but I want to lay out the end result on this platform first.
Thanks to a number of YouTube content creators, the Mk18 rifle has gotten a lot of attention in the past few years. Daniel Defense recently released the RIS III Mk18 and Mk18 Upper for purchase, allowing fans of the platform to have the latest in DD’s bomb-proof rail platform which is now an MLok offering. Before that rail came to market I spent some time looking at my option to decide how to best execute an MLok Mk18-based rifle. I found two options that would do the job for me. The first option is the Geissele Mk16 rail that they developed for the URGI program.The second was the Bravo Company USA MCMR, which has some unique design features and a very slim profile. I ultimately decided to use the MCMR. It reduced the overall weight of the rifle and the slender handguard makes for a comfortable to handle rifle. The reason I was between these two particular rails is the mounting system.
There are many ways I have seen to mount a handguard. The older Yankee Hill rail I used on one of my early rifle builds used a barrel nut that had to be timed to the gas tube hole in the upper, much like a regular barrel nut. It had a locking collar, locking screw recesses, and a threaded outer diameter. The end user would thread on the locking collar, thread on the handguard until the locking screws lined up with the recesses, thread in the locking screws at the rear of the 3 and 9 o’clock rails, then butt the locking collar up against the back of the rail to make sure it would stay in place. It was redundant and bulky, but it did the job. Other companies use a lower profile barrel nut and screws at the 6 o’clock to clamp the rail in place. SSome companies add indexing plates that go into a groove in the barrel nut. Some companies index the barrel nut with set screws. Most of this type of handguard will have indexing tabs that will index the upper receiver of the AR just below the top rail. I don’t like these types of handguard because in my personal experience, they tend to flex or deflect or warp when tightened too much or not enough. I prefer a rail that will go on and be solid 100%.
The BCM MCMR does this in a unique way. The fit between the barrel nut and the handguard is extremely tight. It typically goes on easiest when warmed up with a torch or heat gun. The handguard comes with a steel insert that forms the indexing tabs, which are also exceptionally snug to help with a good alignment of the upper top rail and the handguard top rail. This is extremely important since I have all of my guns equipped with iron sights. If I ever equip my rifle with a laser aiming device, I would want that to be properly aligned as well. The important part of all of this is the way the handguard secures to the barrel nut. Instead of going through the bottom, the clamping screws go through the top of the handguard. They index in a groove in the barrel nut which ensures that the handguard isn’t butted up tight against the upper. There is supposed to be a very narrow gap between the upper and the handguard. When the two clamping screws are tightened they lock each other in place, but more importantly, they tighten the handguard in a way that does not open up the rail base or warp the mounting point. Because it clamps at the top it actually cinches the body of the rail tube to the barrel nut, providing a solid mating between the rail and receiver that doesn’t flex.
The Geissele rail is just as solid at mount up, but it does this by having an extra bit of mass at the 6 o’clock position. The outer diameter is slightly larger and the inner diameter slightly narrower than the dimensions of the BCM, so the material is thicker through the entire handguard. While it doesn’t make much difference in how the rail feels in the hand, it does make the front end of the rifle slightly heavier. Almost a full 2 ounces heavier. Also, the increased “chonk” of the rail where it meets the receiver is a bit bulky and I wanted this rifle to be sleek. I like the Geissele rail and have it on several other uppers I have built, but for this application, the BCM won.
The heart of a rifle is the barrel. I took some time trying to decide if I wanted to do a 10.3″ barrel per the spec of the Mk18, or if I wanted to go slightly longer to get better performance out of my ammunition. Ultimately the 10.3″ length won out for it’s compact overall length. This rifle is a fighting rifle that could be called upon to serve in all sorts of environments, including CQB in tight hallways and rooms. Since the plan from the get go was to run it suppressed I wanted the barrel to be as short as possible without compromising reliability. There are plenty of 10.3″ barrel offerings on the market but I ultimately decided to go with the Ballistic Advantage Hanson profile barrel from their performance line. I have used Ballistic Advantage barrels on a number of builds and they always perform well. The Hanson also came with a pinned low-profile gas block, and having a solid mount on the gas block is another thing I really wanted for this build. The only thing I feel I could do to improve the barrel would be to have a custom unit made. I can’t seem to find a barrel online that offers all the features I would want in a single package. Ideally I would want a .223 Wylde chamber, 1:8 5R rifling, a QPQ Nitrided finish, a Nickel Boron finished barrel extension with M4 feed ramps, a heavy profile with fluting between the chamber and gas block journal to improve cooling and reduce weight, and a recessed target crown with a threaded muzzle. And of course, I would want all of this on a 10.3″ barrel. In all my searching I have not found a barrel that meets these specifications, but maybe someday I will have one manufactured.
As I mentioned, the intent was to have this rifle be suppressed, so for the muzzle device I went with a Griffin Armament Taper Mount Hammer Comp on which I have a Griffin Armament RECCE 5 suppressor mounted. The first time I used this suppressor I was thoroughly impressed. I have used Surefire suppressors for quite some time, but I wanted something a little simpler to function as a full-time suppressor for this rifle. I intend to put a heat wrap on the suppressor eventually and I wanted to be able to attach and remove the suppressor with the heat wrap still in place. The taper mount on the RECCE 5 would make that easy to accomplish. What really impressed me about the suppressor, though, was the significant reduction in gas blowback. The first time I fired it I noticed far less gas being blasted back into my face after firing. It was a fairly calm day, not much breeze (which is rare in Wyoming), and even so I was not getting gassed out. I came to realize quickly that this suppressor would be fantastic in tight hallways and rooms with little air circulation. This is all made possible by Griffin Armament’s EcoFlow Baffle System. In comparison to the Surefire SOCOM556-SB2 it made for a much more pleasant shooting experience while still performing its duties as a signature reduction device. Shortly after my tax stamp cleared and I received my RECCE 5, Griffin released a RECCE 5K model that is slightly shorter. While having the most compact rifle possible is the goal with this rifle, I feel the regular RECCE 5 is perfect. The only way to improve the current setup would be to go with a different Griffin suppressor all together: The HRT-556, which is basically the RECCE 5 with a dual lock mounting system.
While I was working in law enforcement I got to experience a different mindset in training. In the military we had different tools available to us that made working in little or no light a bit easier. As a patrol officer, I didn’t have those night fight luxuries. The department I had worked for required all officers to have a weapon mounted light on their handguns and patrol rifles. I initially had my Mk18 set up with a Surefire Mini Scout Light Pro to save space on my compact rail. When it came time to do our low light work, the scout pro didn’t have the throw I needed to be able to see and engage the targets at extended ranges (roughly 75yds). After having my light fail to perform adequately I started searching for something better. Surefire has their Turbo heads now, which may do the trick, but I opted for a light setup from Modlite. The setup evolved over time and has found its way onto this project. It consists of a Modlite OKW-18650 which I mounted using an Arisaka Defense Offset Scout Mount. I used a Surefire DS00 Tail Cap and a Unity Tactical MLok Hot Button for my switching options. The tail cap having an activation switch allows me to be able to easily activate the light when shooting with my non-dominant hand while the Hot Button allows me to easily manipulate my light with my left thumb while operating the rifle with my dominant hand. The throw on the Modlite is impressive and at short ranges the powerful light can be blinding. It is powered using rechargeable 18650 batteries, which have a considerable lifespan between charges. The location and switch positions work well with the Magpul vertical foregrip and hand stop I have installed on the 6 o’clock MLok mounts.
I chose to build the rifle on Aero Precision’s M4E1 threaded upper and matched lower (they can be purchased as a set HERE). I’ve heard people talk down about Aero Precision, which I don’t understand. A receiver is a receiver is a receiver. Yes, billets may be machined to tighter tolerances, but a receiver built to military specifications is going to function with expected parameters and won’t cost an arm and a leg. The M4E1 receivers offer some upgrades from the standard mil-spec. The threaded pins for the bolt release and forward assist are a nice touch. Having the skeletonized trigger guard formed into the receiver is also nice. The fit between the receivers is pretty good as it is, but if you want to silence the minor receiver rattle, the lower is equipped with a nylon tipped set screw to snug things up.
One discussion I have had on several occasions with different people is the one about the need for a forward assist. I have been told by several people that they have never needed it, so they don’t build with uppers that have the provision for it any more. I’m going to say this for public record: if you’ve never needed your forward assist, you have never run your gun hard. Even shooting on an indoor range I have racked up a high enough round count to have to need that magical little button that no one seems to understand. If you shoot a mag through your rifle and then set it on the table and shoot something else and drink a soda and then come back to it once the rifle has had time to cool…you will probably not ever need to use a forward assist. If you shoot a lot and move positions, and shoot prone and urban prone, shoot under cars and through windows, you’re kicking up dust and your suppressor is coughing gas and carbon back into your rifle…you will need your forward assist. Don’t build an AR without one unless you are building it for the express purpose of being a safe queen. I’m going to step off my soap box and get back to the build rundown now.
The bolt and trigger are the only other two things of note that I want to bring up before I get into the optic selection. I used a Lantac E-BCG for this build with the black nitride finish. Again, knowing I was going to suppress the rifle, the E-BCG has a couple features to help with forward venting of the gas to minimize gas blowback in the operator’s face. That rides back against a Geissele Super 42 H2 buffer and spring and is charged by a Geissele ACH. Given those parts it may come as a surprise that the trigger is not a Geissele. I had used the Geissele SSA-E in my builds for a long time, but then someone suggested I try the LaRue Tactical MBT-2S Trigger. I tried it and I like it quite a bit. It is crisp with a positive reset and it costs way less than the Geissele does. The trigger is actuated by a Radian Weapons Talon, which has become my favorite safety selector for a number of reasons.
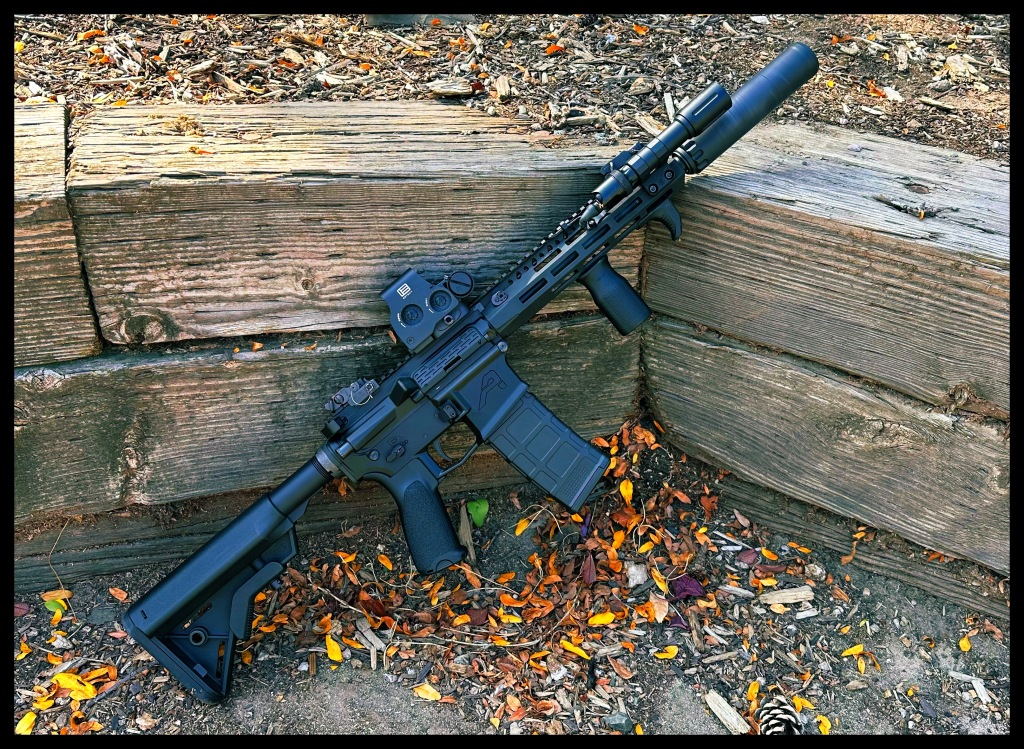
We have seen in recent news how effective Low Power Variable Optics (LPVOs) can be in the hands of law enforcement. I had actually put an LPVO on this build for a while and, while I like it, I feel its a bit much. This rifle has a 10.3″ barrel which reduces it’s maximum effective range and drops the ballistic performance of the ammunition it is fed. The Navy SEALs typically run 10.3″ barrels with Mk262 77-grain 5.56mm NATO ammunition so that the mass of the bullet can make up for some of the lost velocity from the shorter barrel. The max effective range of the Mk18 is published to be 300 meters. I don’t feel an LPVO is an appropriate choice for this particular weapon. At least not the one that I have. So I stuck with the Eotech EXPS3-0 for this build. I like the Eotech. I have used them for a long time and they never let me down. When my eyes eventually begin to fail me I can always add a magnifier behind it, but for now, I can easily reach out to 300 meters with just the Eotech by itself.
Overall this rifle as a complete package is fantastic. The combination of parts has made for a rifle that I know I can count on to do the job it was built for. It provides accuracy and speed in a compact package that would be ideal for any serious work whether it be in closed spaces or out in the open. I’ve run drills with it on C-Zone steel at roughly 25 yards with satisfying results. When I have the opportunity I would very much like to take it to a carbine course and put it through its paces.
One thing I have not spoken to is the process for registering a rifle as an SBR. This is a step that a lot of people do not want to do, but it really isn’t all that difficult. Submitting a Form 1 with the ATF actually comes back much faster than a Form 4. I’ve done several and the fastest return came in one week and the longest took 3 weeks. My biggest piece of advice for anyone willing to drop the $200 to register and build an SBR is to have your fingerprint cards done first. The fingerprints have to be submitted within 10 days of filing the Form 1. I always overnight ship my fingerprint cards to ensure they don’t get lost or arrive late. Also, have a plan for how you intend to get your receiver marked. Those are the only real hidden costs for filing a Form 1. Everyone knows its $200, but then you have to buy your fingerprint cards, mail your fingerprint cards, and have your receiver marked. The BCM grip I use has a sealed storage compartment with a hinged cap. Once I receive my approved Form 1 I make a copy and store it in the grip. In the case of this rifle I also keep a copy of my Form 4 for the suppressor in the grip. That way any time anyone wants to annoy me for my paperwork it is always with the gun. If anyone reading this has been on the fence about submitting a Form 1 to make their first SBR, if the SBR is something you want, don’t let a little paperwork be the thing to keep you from doing it. Compact rifles are fun to shoot and being able to run a CQB course with a suppressed rifle is an absolute blast.
Until the next one, stay safe out there.
