The last rifle I outlined was the Tier 3, so I’m sure anyone who actually reads these was expecting this one to cover the Tier 2. The Tier 2, however, became the property of my friend Roman some time ago. It also has not yet been equipped with an optic. For the time being I will skip the Tier 2 and we can eventually come back to it.
The Tier 1 took a lot of time and deliberation to develop. Roman and I started talking about this project a while back and many options did come up for what the Tier 1 could be. We discussed billet receivers and a custom barrel from Lothar Walther. We discussed exotic materials like magnesium aluminum alloy and titanium. We discussed trigger options and optics. We looked into making the most exotic and expensive combat capable weapon platform we could. Ultimately I decided that the extreme expense of a lot of the parts we had discussed just would not be worth the diminishing return. The exception to that being the custom barrel, but even then, I felt we could save a little bit of money on a production barrel and yield comparable results.
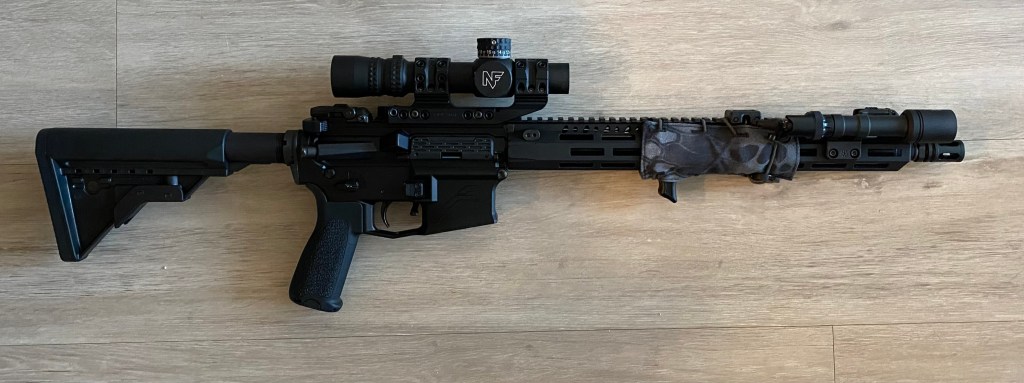
An important factor in this project that I eventually decided to include was that every part needed to be an off-the-shelf option so that anyone with the budget and inclination could replicate what we have done. The barrel, being the key component of the rifle, needed to be something a bit more than a heavy profile SPR or DMR barrel. Lilja makes the barrels that were used in the RECCE rifles that Crane assembled for DEVGRU, but those are not readily available and were not exactly what I was looking for in a barrel for this build. I needed something that was constructed with meticulous attention to detail. Something that offered more than a typical 16″ Mid-length commercial rifle would while still being an off-the-shelf part. Ultimately I went with a Griffin Armament barrel. Griffin Armament’s HEDP barrels (FULL HEDP BARREL LINE) are designed with a meticulous attention to detail that I found suited the Tier 1 concept well. I opted for the 16.1″ fluted model for the Tier 1. Not only are they built to be exceptionally durable, they also utilize the 5R rifling that the US Army utilized in the M24 Sniper Rifle. I have used the 5R rifling on several projects and every rifle I have ever equipped with this type of rifling in its barrel has been a tack driver.
For anyone who is not an obsessive gun nerd like I am, 5R rifling is unique because of how the barrel interfaces with the bullet with this particular cut. The bore of a rifle is not smooth. There are grooves cut into the barrel’s bore that press into the bullet when it is pushed forward by the expanding gasses caused by the gunpowder igniting in the casing. Science. The pressure of those gasses send the bullet down the barrel and the fit between the bullet and the bore is very tight. The grooves are typically very close to the same diameter of the bullet. The lands, however, are tighter and cut into the bullet. Since they are cut to create a spiral they will cause the bullet to spin. This rotation stabilizes the bullet in flight just like a football that is thrown with a good spiral. The rate or speed of that spin is determined by the rifling’s rotational ratio. On the Tier 1 rifle that rotation is 1:8 or 1 full rotation of the bullet for every 8″ it travels. In a 16″ barrel the bullet makes ALMOST 2 full rotations before it leaves the muzzle. On a traditionally rifled barrel, the lands are directly opposite each other and crush and deform the bullet with equally imposing force. On a 5R rifled barrel the lands are opposing the grooves which causes less pressure and deformation on the bullet. In order for the lands to be opposite the grooves there are 5 of each. The lands also have less an angle on the transition side to the groove, making a smoother appearance to the bore. This leads to there being less space for fouling and copper to build up and also causes less severe deformation of the bullet. All of this lends to more consistent bullet flight which leads to better accuracy.
The HEDP barrels also have a number of other features that will improve service life and functionality. I went with the fluted model of the weight savings and improved cooling characteristics. When I went through my department’s rifle course my Mk18 (built to URGI specs) got so hot it was difficult to handle without gloves. Improving cooling became an important factor for a gun that may be used in a prolonged firefight. Even more so on this rifle because I do intend to suppress it down the road. The combination of features on this barrel should produce the accuracy I expect for this project. I look forward to seeing how it compares to the Tier 3 rifle in practical exercise.
Being the T1, nothing on the rifle is a standard part. I did use a lot of Griffin Armament parts for this build because I like the thought process behind the design. The barrel is tipped with a Griffin Armament Hammer Comp. The spec for the project was a flash hider manufactured to A2 specs for mounting of a suppressor. The Hammer Comp is made to the specs of an A2 flash hider to ensure that it is a solid mounting platform for Griffin Armament’s Gate-Lock suppressors, but it is also compatible with their GP-Nato suppressor which uses a mount designed to affix to a standard A2 flash hider. The Hammer Comp also has sacrificial baffles that are designed to reduce recoil and improve the life of the suppressor that will be attached to it. It also looks really good.
More Griffin Armament parts can be found at the opposite end of the rifle. To mount the stock I opted for the Griffin Armament Maritime Receiver Extension. This buffer tube is machined with drain holes so that if it is being utilized in a maritime environment water can more easily drain from the system. I mated the Extreme Condition Stock to the extension so that those drain holes could be taken full advantage of. I also was impressed by the standard of durability Griffin engineered into this stock. I felt the improved hard use durability would be a valuable feature in the Tier 1 rifle.
The whole system is built on an Aero Precision M4E1 receiver set. I like this receiver set and have used it on several builds. It has a lot of features that can be found in a billet receiver set but with the advantage of not costing $400 or more. All of the parts I used to complete the receivers are enhanced from the standard parts. I chose to install one of my favorite triggers in this rifle, the Geissele SSA-E. I love the light 2-stage pull of the trigger. It makes it good for both precision work as well as high-speed CQB with rapid engagement and follow shots. The Geissele triggers just run well, plain and simple. The mag release is and extended Magpul unit and the bolt catch/release is also equipped with a Magpul B.A.D. Lever. While running the rifle course I mentioned earlier I learned the value of a short throw ambidextrous safety selector. I tried a couple different models, but ultimately found that the best one on the market is the Radian Talon. All the other safety selectors I tried use some sort of keyway lock up and a screw to hold the selector lever to the core of the selector. That design works, but it can have issues and failure points. The Radian utilizes a very tight fitting dovetail and a spring detent to retain the levers. Quick and easy to use if the end user wants to swap out levers. No need for Loctite, no risk of losing a lever. The Talon also offers the choice of 90° throw or 45° throw. I have come to really like the shortened 45° throw on my guns. For my takedown pins I went for the Battle Arms Development EPS Enhanced Takedown and Pivot Pin set. The enhanced features are simple, but effective. The rear takedown pin has a scallop cut that allows the user to more easily pry it out to the open position, and the rest of the pin head has knurling around the outer edge. The pivot pin has a dimpled surface that slo aids in a positive grip to pull it open. As far as the grip, I have come to really like the feel and grip angle of the BCM Gunfighter Grip Mod-1. To finish out the lower receiver I used a Magpul QD end plate and a Geissele Super 42 H1 buffer system. I like the Super 42 buffer spring because it doesn’t make that fork-over-cheese-grater sound that is typical of the standard single-wire chrome silicone buffer springs.
The upper receiver is a bit less involved. I always use uppers that have a forward assist on my rifle caliber builds. Anyone who says a forward assist isn’t necessary has never really run their gun. I opted for a Forward Controls Design Low Drag Forward Assist on this build. I like the idea of reducing potential snag points on a weapon. For the dust cover I went with the tried and true Strike Industries Ultimate Dust Cover. For the charging handle I went back to Geissele and got an Airborne Charging Handle. Inside the upper is a LANTAC E-BCG with a black nitride finish. The E-BCG uses better than mil-spec materials and has a gas port that is directed forward to vent excess gas away from the shooter. This is a great feature for suppressed rifles. For the handguard I used the BCM MCMR 15. I like the BCM handguards a lot. The fit between the handguard and the barrel nut is extremely tight and the reduced play makes for a very solid mount. BCM also chose to put the clamping bolts at the top of the rail, which reduces the potential for rail distortion when fully locked up. The only thing I wish BCM had done on their MCMR rails would be a machined-in QD socket. They do include an M-Lok mounted QD socket in the kit though, so I can give it a pass. For backup iron sights I opted to go for the Magpul MBUS Pro sights, but I chose to use the LR model rear sight.
The light setup on this rifle was a bit of a micro project. I wanted a light that would be robust and have a good bit of throw. This is another area where I felt it was good to apply lessons learned in training to this project. I had initially equipped my duty rifle with a Surefire M300 Scout Pro. When it came to practical application of weapon lights for engagement, the Surefire lacked throw and was practically useless at extended engagement ranges. It was great for something like clearing a building or maybe navigation where occasional white light may be used, but we were engaging targets out to 75yards from under and around obstacles and the Surefire just would not do the job. Following that training event I swapped out my Surefire for a Modlite OKW-18650 and have been very happy with the result. My budget did not allow me to make that sort of investment for this project, but I would happily get another of those lights for this rifle if I could spare the money. On this particular rifle I went through Arisaka and assembled my own light setup. I used an Arisaka 600 Series Light Body, a Malkoff Devices E2XT Head, a Surefire DS Tailcap, a Modlite ModButton, and an Arisaka Offset MLok Scout Mount. I decided to not go with rechargeable batteries just to simplify things a bit. I keep a small stockpile of CR123 batteries on hand for my Eotechs, Surefires, Streamlights, and various other pieces of equipment. Maintaining 18650 batteries can be a bit of a hassle and a quick battery swap for spare CR123s is much easier to facilitate. The light has a good amount of throw and some good spill for peripheral observation as well.
This rifle would not be the Tier 1 without a respectable optic setup. In keeping with the specs I looked long and hard for a Low Power Variable Optic that was First Focal Plane and wasn’t overly complicated. While this rifle could easily engage to 600meters or more, I didn’t want a noisy reticle. I wanted a quality optic that would serve well as a red dot at 1x magnification, but would also offer the performance at maximum magnification to be used in an SPR/DMR role. There were several models across the market that I considered, but ultimately I landed on the Nightforce NX8 1-8×24 F1 with the FC-Mil reticle. I couldn’t mount an optic like that in just any scope mount. I am very luck to live close to the national distributor for Spuhr and had been shown why they are a superior mount on a previous visit to their facility. It made sense to me to mount the Nightforce in a Spuhr 30mm QD Mount.
That covers the essentials of the rifle. I also added a Burn Proof Gear Rail-rap and a Slate Black Industries Slate Stop just for a little better handling. This is the Tier 1 as it stands. There are definitely other ways this rifle could have been executed. If I had a greater budget and more time to wait for parts I likely would have made a few different choices. For a combat rifle built with available off the shelf parts to the spec of this project, I feel the goal has been well executed. I’m looking forward to the Test and Evaluation with this particular rifle. This is the first rifle I have built with the specific goal of compiling premium parts to achieve the end result. It is my hope that the combination produces exceptional results for accuracy and functionality.

One thought on “Kitting Up: The Rifle (Part 3) – Tier 1”