I know I mention it quite a bit, so I figured it was about time I did a feature on my duty rifle. I have to cover a bit of history to get to where my rifle is today. I never touched a real gun until I was in basic training. I enlisted in the Army as a Cavalry Scout in 2005. At that time the Cavalry MOS soldiers were trained at Fort Knox, Kentucky. I learned to shoot on the humid, green ranges during the rain that seemed to last for weeks as New Orleans was getting hammered by Hurricane Katrina. We used worn out old Fabrique Nationale M16s with iron sights and the traditional polymer furniture. Fixed full length buttstocks, rifle length gas systems and long handguards. The rifles were constantly drown in CLP by our drill instructors. The oil would gather dirt and sand and jam the rifles. I learned the value of the forward assist from the experiences I had at Knox. With no point of reference outside of the the experiences I had, the very basic M16 became my standard against which I would compare every rifle moving forward.
When I got to my unit at Fort Bliss I was issued a brand new FN M16 with a rifle length Knights Armament quad rail. Everything was new, so tolerances were much better than the worn out rifle I had carried at Ft. Knox. The quad rail was heavier, making it questionable whether it was an improvement or not. The rifle was accurate enough and I was issued an Aimpoint M68 red dot, which was an interesting change. I ran that setup until my unit finally got enough M4s to issue me one during my first tour. I left the M4 as it was issued until my second tour. I ran through the modifications and setup of my second tour duty rifle in a previous article (which can be read here). That was the first time I had modified a rifle to better suit my needs.
When the rifle I’m able to carry became my choice I decided to fall to what the best operators were using when I was still serving in the Army. That fell to the Navy SEALs and their Mk18s. As with every AR I’ve owned since leaving the Army I built my Mk18 clone myself rather than buy a finished rifle off the shelf. Fortunately the specs for the Mk18 are readily available.
I started with an Aero Precision M4A1 Clone lower (M4A1 Lower) in an attempt to maintain an authentic appearance. The barrel used in the rifles the SEALs carry was made by Daniel Defense. At the time I built my Mk18 the Daniel Defense barrel had been out of stock and unavailable everywhere for quite some time. Ballistic Advantage makes a version of the Mk18 barrel that I decided to use for my build since it was available (BA 10.3″ Gov’t Barrel). One of the most important specs of the Mk18 barrel is the larger gas port. When NSW Crane was developing the Mk18 they spec’d a .070″ gas port increased from .062″ to account for the reduced dwell time of the shorter barrel.
When I was building my Mk18 the URGI program had been fielded and Geissele had made limited releases of the Mk16 Super Modular Rail that they had used when they developed the URGI platform. I liked how solid the mounting point was on the Geissele rail. The rails on the market that use a pinch joint are not my favorite design. The Geissele, BCM, and Aero mounting systems are some of the better, more solid designs, and less susceptible to warpage and distortion. That quality is important for keeping things like lasers and front iron sights accurate. If a handguard flexes, you lose your zero. The Geissele system is good and solid and offers a great mounting platform on its MLok slots.
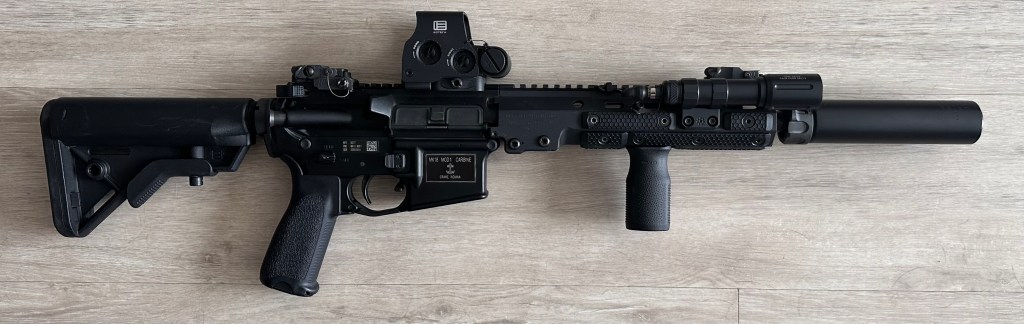
Being a short-barreled rifle, the Mk18 is best used with a suppressor. On the 10.3″ barrel adding a suppressor typically doesn’t make the overall length any greater than an unsuppressed M4 carbine. I wanted a durable suppressor with service record and contract awards. The Surefire SOCOM series was my first choice. I went with a Surefire 3-prong flash hider as a mount and muzzled the rifle with a Surefire SOCOM 556-SB2. This model was engineered for 5.56mm rifles with sub-10″ barrels, but on the 10.3″ barrel it performs well and keeps the length down.
Internally there were a number of changes made from the standard mil-spec components. The bolt carrier group is a LANTAC E-BCG which has a lot of improvements over the mil-spec Bolt Carrier Group, one of the most important being the addition of another gas vent that is forward angled to assist with venting off the excess gas from running a suppressor. I also went with a Geissele Super 42 heavier buffer system. Not only does it alleviate the spoon-on-cheese-grater sound a tradition buffer creates, it also has a bit more mass to help with the cyclic rate of the over gassed system.
The Geissele appointments continue with the use of the URGI-approved Airborne Charging Handle. Low snag, good grip texture, and ambidextrous, the ACH is one of my favorite charging handles I have ever used. Naturally the trigger is also a Geissele unit: the SSA-E. This is one of my favorite triggers and as long as my budget allows it I use it regularly for my builds. I also extended some of the controls using Magpul parts. The BAD Lever and the Enhanced Mag Release make the controls a little more easily accessible and easier to manipulate. The grip is a BCM Gunfighter Grip Mod 3, which has a fixed front tang intended to cover the gap where the trigger guard, grip, and receiver all meet. I used a Enhanced Trigger Guard which also fills that gap in the receiver, but I like having the tang on the grip as a smooth transition point. Doing rifle drills with my early service rifles taught me the value of smoothing out that transition point. With enough repeated ready-up drills the receiver will wear your middle knuckle of your middle finger raw. On this rifle I went with a good old military standard, the B5 Systems Government Contract SOPMOD Stock.
I equipped the rifle with A.R.M.S. 40L-F and 40L iron sights cowitnessed with an Eotech EXPS3 holographic sight. I am quite fond of the rapid aiming and open field of view the Eotech offers compared to red dots with larger bodies that tend to choke off the field of view. I also like that the EXPS3 has a night vision mode so that when I can finally acquire a set of night vision optics I can continue to run my rifle in a familiar configuration.
While training with my Mk18 I found a few shortcomings. I had initially equipped my duty rifle with a Surefire M300 Pro and Surefire tape switch. I also used a standard single-sided safety selector. Those things all got changed out because of my training experiences. When we were expected to engage targets at 50 and 75 yards using our weapon lights to positively identify our targets, the Surefire fell short. It would be just fine for clearing houses like the underpowered Surefire I was issued with my second tour M4, but when it came to providing good visibility at distance, it just did not have the throw. I opted to upgrade to a Modlite OKW-18650 which I mounted to the rifle with an Arisaka mount. For activation I got a Unity Tactical MLok Hotbutton, which I installed at the 10/11-o’clock position opposite the light which I mounted to the outside of the rifle. I used Arson Machine MLok and Picatinny wire guides to keep the wire under control. During the training we fired very high volume and my rifle ran incredibly hot. To help with that I got some Slate Black Industries MLok Rail Panels as well as a Magpul MLok Vertical Foregrip. I may change this out in the future to copy the Tier 1 Mk18 that I mentioned in a previous article. That rifle uses a Burn Proof Gear Rail Wrap instead of the panels. I have not yet been able to evaluate which is the better way to mitigate the heat from the rifle.
This rifle also taught me the value of having a short throw ambidextrous safety selector. Over the course I went through I found the standard selector to be a failure point. This is what led me to the Radian Talon. I bought a different short throw ambi selector from a local shop during the course and it almost failed on me the first day I had it. The design of the Talon is the best i’ve seen. It can be set for either 90° or 45° throw and the levers are held in place by a dove tail with a spring-loaded detent. No screws to come loose or fail.
This is the rifle I carry in my patrol vehicle every night. This is the rifle I turn to when the lives of my friends may depend on the equipment I use. I love this rifle platform and will stand by it for duty use as a patrol officer for as long as I live. It has served me well and will continue to serve me well for years to come.

